Create your Postalytics Triggered Drip Campaign
From the Campaigns dropdown menu, select ‘New Campaign, then “Triggered Drip” then select the Zoho icon.
The Postalytics Triggered Drip Campaign Wizard will walk you through each step of the process. Click ‘Next’ after each step has been completed to move on to the next step.
For a full deep dive on the Triggered Drip Campaign Wizard, you can refer to the Triggered Drip Direct Mail Campaigns overview article.
Be Sure To Select The Proper Zoho Integration
When you arrive at the ‘Sync’ step within the Wizard, you’ll select a Zoho Integration. If you have more than one Integration, it’s important to choose the correct Integration for this particular campaign, as this selection will define:
- What field mappings will be used
- What custom field to post the status codes back to
- Which status codes to post back

Triggered Drip Campaign Test Mode
When your Triggered Drip Campaign Setup is complete, it will be in Test Mode by default.
Test Mode enables you to trigger test contacts from Zoho that will generate PDF only mailers. The PDF’s are fully formed mailers that ARE NOT actually sent to the print/mail network and do not cost you any direct mail credits to use.
You can trigger as many contacts as you wish with the campaign in Test Mode. You can also toggle between test mode and live mode as often as you’d like, in case you need to modify your automation after it is published (or modify the template being used in the campaign).
When you’re done testing and ready to go live, just toggle the Postalytics Campaign to “live mode”. If you need direct mail credits (minimum 100 to start a campaign), you’ll be prompted to purchase them first, then you can toggle the campaign to live mode.
Configure The Zoho Webhook
Before testing begins, you’ll need to ensure that the Webhook in Zoho will send the same fields that were mapped during setup. There are a couple of steps needed to ensure this is correct.
First, you’ll adjust the ‘URL to Notify’ in Zoho to be the endpoint URL created in the Postalytics Triggered Drip Campaign.
You’ll find the newly created Postalytics Campaign endpoint URL in the Campaign settings.

Copy this URL to the ‘URL to Notify’ in Zoho.

Configure The Zoho Authentication
Authentication is used as a way to ensure that the web traffic that hits the endpoint URL is what it should be. Think of it as a handshake or a confirmation that the data coming over is who and what is expected.
Next, you’ll need to make sure that the authentication required to send direct mail to this account is included in the Webhook. In Zoho, there are several ways to do this, but we’ll be using Basic Authentication.
In the Zoho Webhook, next to the ‘Authorization Type’ choose ‘Connection’.
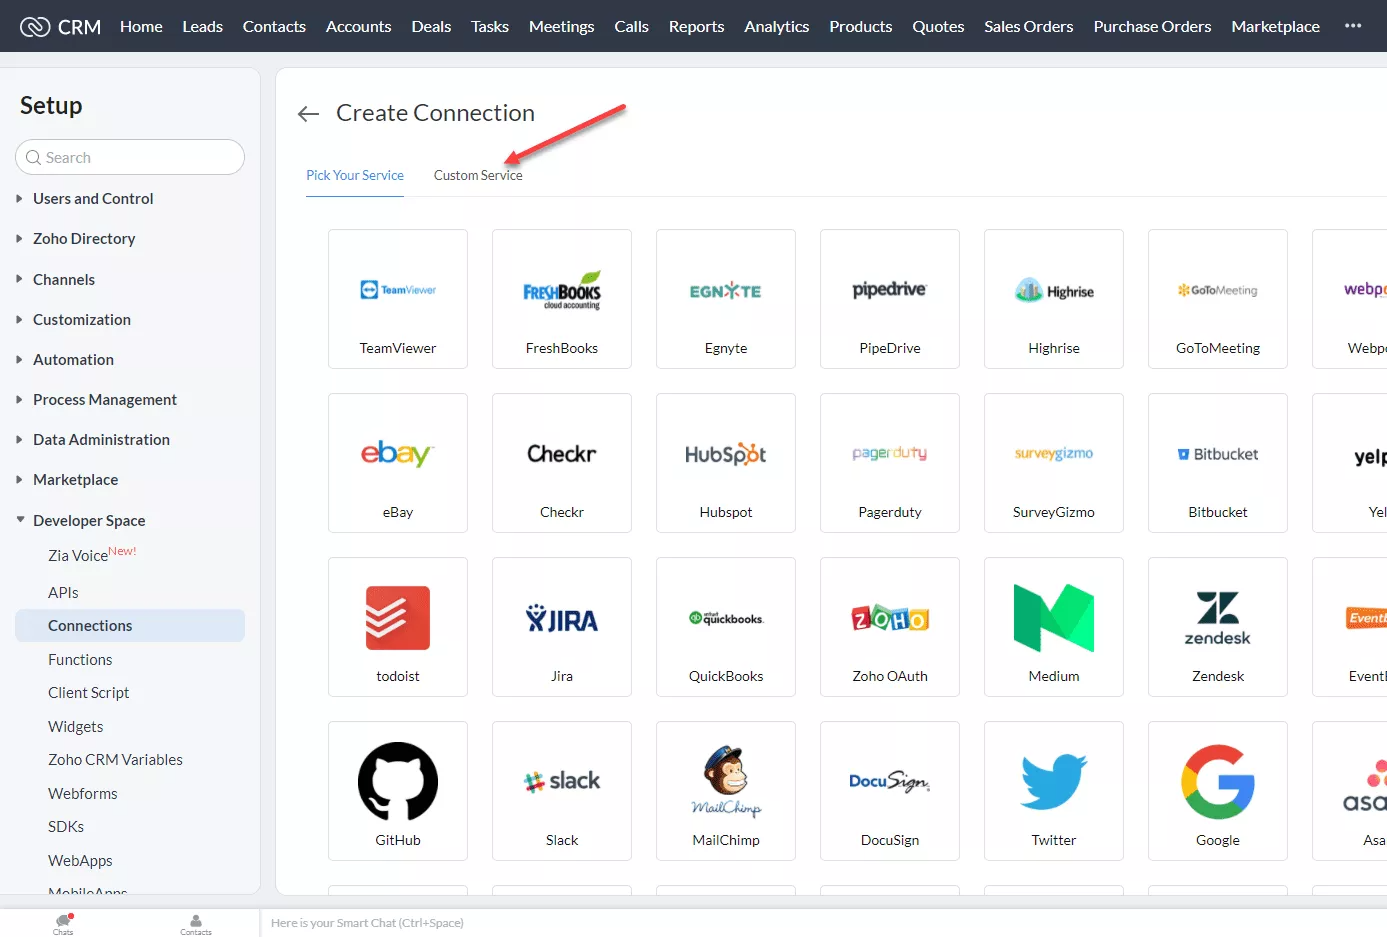
If this is the your time setting up a Webhook in Zoho, you will need to also click ‘New Connection’
If you do click “New Connection” you’ll be directed to an app page to select a service. At this time Postalytics is not listed, so you will select the Custom Service tab.
In the New Connection window, choose ‘Basic Authentication’ as the authentication type and fill in the other fields similar to what is shown below.

Click ‘Create and Connect’. A login popup window will appear.
This authentication will use the API key from the Connect Hub page in the link below your user name.

Paste the API key in as the username and leave the password blank.
Click ‘Save Details’ so that this connection is saved and can be reused for other Webhooks.

On the Zoho Webhook screen, choose this new connection from the dropdown menu for the authentication of the Webhook. Click ‘Save and Associate’.

Test The Trigger
You are now ready to test this trigger using the same simple Webhook and action used to creating the mapping during the Integration setup.
Once the trigger has been executed in a test contact, click the Timeline tab at the top of the Contact page to verify the Webhook was triggered.
Now that you’ve sent a test, you can review your Postalytics Campaign Dashboard to ensure that a record has been received.
When you trigger mail to your campaign in Test Mode, it will generate a PDF that you can easily review. Click 'Preview Created Mail'. A popup window will appear with a PDF of each mailpiece generated for your test records. The PDF is exactly what gets created in a “Live” campaign, it just doesn’t get printed and mailed.

Remember that since you are in test mode, none of these pieces have actually been sent to the printer. However, once your campaign has been toggled to “Live Mode” and your triggers are coming through, clicking 'Preview Created Mail' will show live mail that has actually been sent to the printer.
If the PDF’s look correct, then set your campaign to “live mode” and let the system do the work from there. You can now trigger direct mail from Zoho CRM workflows on a fully automated basis.
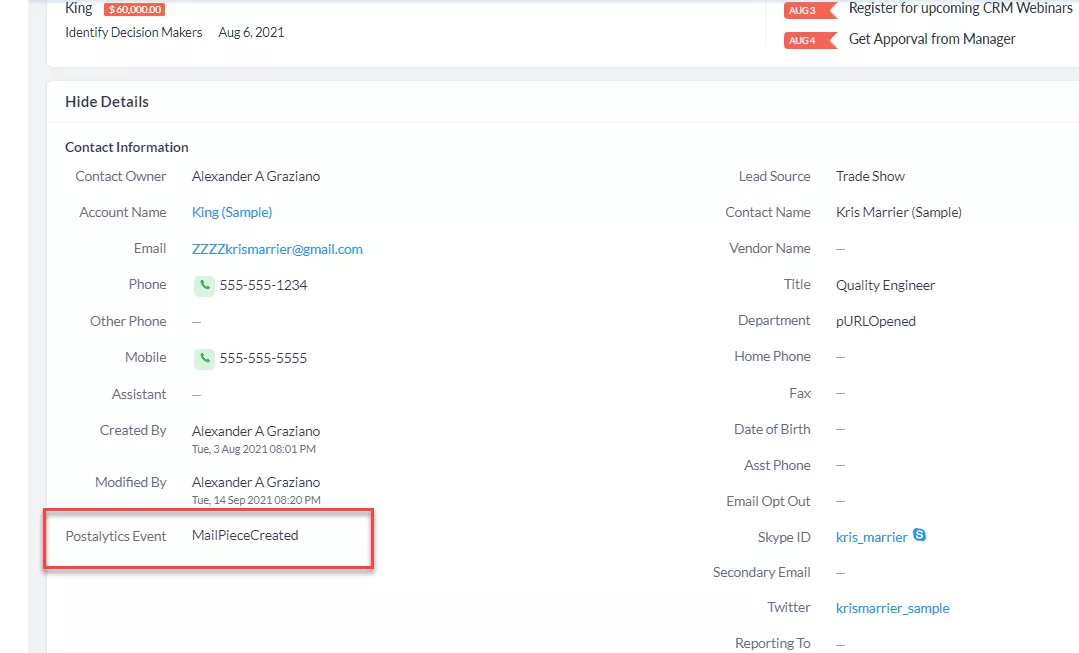
Direct Mail Events Back to Zoho
Depending on the choices made in the integration wizard, select direct mail events will be posted back to Zoho. After you run a test, flip back to Zoho and refresh the user you triggered the send with. You should now see the MailPieceCreated status in the Postalytics Event field.
Let’s Connect — We Can Help With Your Zoho Integration!
Regardless if you want to be self serve or if you’d like some help, we’re here for you! We love to talk with customers via email, chat or by scheduled call, so don’t hesitate to reach out: