
A pixel tracks one website and controls what data you get back and how leads are billed. The setup wizard walks you through it in a few short steps.
.png?width=670&height=196&name=mailback-create-new-pixel-jul2026(1200px).png)
Start the wizard
From the MailBack™ Retargeting list, click New MailBack™ Pixel.
.png?width=670&height=287&name=mailback-start-mailback-wizard-jul2026(1200px).png)
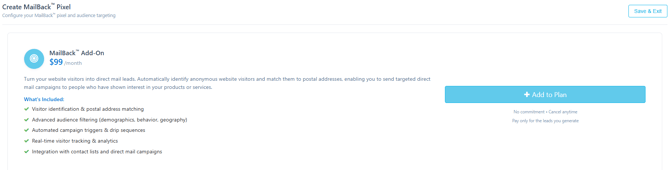
Add the MailBack™ Plan.
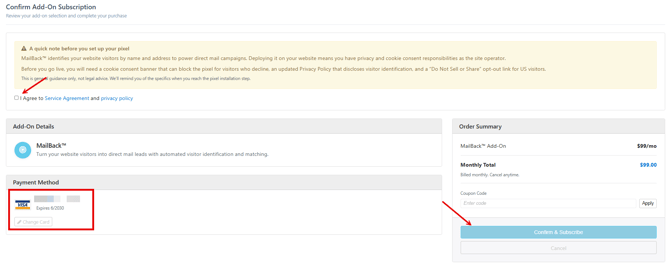
Agree to the Service Agreement and Privacy Policy, Review the Payment Method, and Confirm the Subscription.
 Step 1 — Website Information
Enter the website domain(s). The pixel will run and give the pixel a name.
-
Pixel names accept letters, numbers, and spaces only.
Set the schedule: leave Always On, or toggle it off to set a start and end date.
.png?width=670&height=196&name=mailback-pixel-domain-name-and-schedule-jul2026%7B1200px).png)
Step 2 — Data Configuration
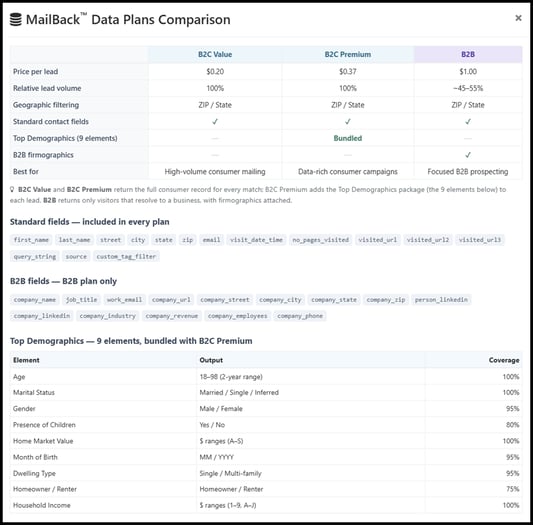
Choose your Data Tier (consumer vs. business — see Choosing a Data Tier), optionally turn on Phone Append, and set a Monthly Leads Budget that caps your spend. Note there is a $50/month minimum budget. The Per-Lead Price box updates live as you choose.
.png?width=670&height=455&name=mailback-pixel-data-configuration-jul2026(1200px).png)
Tip: Not sure which tier fits? Review "Compare Data Plans" for a side-by-side breakdown.
Step 3 — Filtering
Narrow who counts as a lead using geographic and demographic filters (for example location, age, or income range). Leave filters open to capture everyone you're entitled to.
.png?width=646&height=322&name=mailback-pixel-filtering-jul2026(1200px).png)
Step 4 — Data Action
Choose what should happen to captured leads. Leads always run through a Flow — here you decide what that Flow does, such as simply saving leads to a contact list or also mailing them automatically.
.png?width=670&height=248&name=mailback-pixel-data-action-jul2026(1200px).png)
Step 5 — Review
Confirm your settings, estimated per-lead price, and monthly leads before continuing.
.png?width=670&height=433&name=mailback-review-pixel-data-jul2026(1200px).png)
Step 6 — Payment
Add or confirm your payment method. MailBack™ bills per lead delivered, within your monthly budget. Note there is a $50/month minimum budget.
.png?width=670&height=223&name=mailback-create-pixel-payment-jul2026(1200px).png)
Step 7 — Install your pixel
On the final screen you'll get your pixel snippet. Copy and paste it into your website's HTML (typically before the closing </body> tag). Leads begin once the pixel is live and installed.
.png?width=670&height=280&name=mailback-pixel-created-successfully-jul2026(1200px).png)
Note: A new pixel starts "Off". When you're ready, open the pixel and click Go Live to begin collecting leads — see Pixel Status.